One
ball is dropped. The other is thrown. Which ball will hit the ground
first?
Note:
For illustration purposes, the viewport background in this tutorial
has been set to black.
Choose
File > Reset.
Activate
the Perspective viewport.
In
the Create panel, choose Plane.
Open the Keyboard Entry rollout.
Enter X = 90, Y = -70, Length = 150 and Width = 400
Click
Create.
A plane appears in the Perspective viewport:
In
the Name and Color rollout, click the color swatch.
In the Object Color dialog box choose AutoCAD ACI palette.
Then click the white color swatch:
Name
the plane Floor:
In
the Create panel, choose Sphere.
In the Parameters rollout, enable Base to Pivot.
In the Keyboard Entry rollout, enter Y = -50, Radius = 10.

Click
Create. A
sphere appears in the Perspective viewport:
In
the Name and Color rollout, name the sphere Launch Ball.
In the
Color Selector dialog box, assign the ball a bright red color:
 Press the space bar to lock the selection of the Launch Ball.
Right-click on the ball and choose Properties.
In the Display Properties group, turn on Trajectory:
 Turn
on the Animate button and advance the time slider to frame 20:
Turn
on the Animate button and advance the time slider to frame 20:

 Pan the Front viewport a little down and to the left.
In
the Front viewport, move the ball to the right in X.
The ball's trajectory follows behind:
Two
keys appear in the track bar: one at frame 0 and one at frame 20.
Drag the time slider to frame 10:

The
ball moves half way back:
Move
the ball upward in Z to make a nice arc:
Scrub the time slider back and forth between frames 0 and 20. The
ball follows the trajectory.
 Click Open Track View.
On the left side of the track view, locate the Launch Ball.
Expand the hierarchy and select the Position track:
 In the
toolbar, click Function Curves. The function curve for the Position
controller appears:
In the
toolbar, click Function Curves. The function curve for the Position
controller appears:
 In the
toolbar, click Parameter Curve Out-of-Range Types.
In the
toolbar, click Parameter Curve Out-of-Range Types.
In the Parameter Curve Out-of-Range Types dialog box, click Relative
Repeat and OK:
The
function curve repeats across the track view window:
 In
the toolbar, choose Edit Ranges.
In
the toolbar, choose Edit Ranges.
Drag the range bars of the ball 10 frames to the right:

Close
the track view. The trags:
Scrub the time slider back and forth. The ball bounces across the
screen:
Select the Launch Ball and choose Edit > Clone.
In
the Clone Options dialog box, choose Copy.
Name the copy Drop Ball and click OK:
In
the Name and Color rollout, select a bright blue color for the Drop
Ball:

In
the track bar, select the key at frame 10.
Right-click on the key and choose Drop Ball:Position:
In
the Drop Ball:Position dialog box for key 1, set X = -50, Y = -50,
Z = 0. Then click the right arrow.
In the Drop Ball:Position dialog box for key 2, set
X = -50, Y = -50, Z = 75. Then click the right arrow.
In the
Drop Ball:Position dialog box for key 3, set X = -50, Y = -50, Z
= 0.
Close the Drop Ball:Position dialog box.


Select
the Launch Ball.
In
the track bar, select the key at frame 10.
Right-click on the key and choose Launch Ball:Position:
In
the Launch Ball:Position dialog box for key 1, set X = 0, Y = -50,
Z = 0. Then click the right arrow.
In the Launch Ball:Position dialog box for key 2, set
X = 50, Y = -50, Z = 75. Then click the right arrow.
In the
Launch Ball:Position dialog box for key 3, set X = 100, Y = -50,
Z = 0.
Close the Drop Ball:Position dialog box.
 Click Time Configuation.
In the Animation group, set the animation length to 60.
Then click OK:

 Play the animation. The plays in a smooth, continuous loop.
At frame 20, your animation should look like this in the Front viewport:
Zoom
and pan the Perspective viewport so that your animation fits in
the view.
Open the Cameras and choose Free.
Click once in the Perspective viewport to create a free camera:
Press
CTRL + C to match the camera to the viewport.
Press C to change to the camera view.
Select
the camera.
In the Modify panel, click the 50mm button.
Then check Orthographic Projection:
Your
camera view changes to an orthographic view:
 Open
the Render dialog box.
Open
the Render dialog box.
Set
the Time Output to Active Time Segment:
In
the Render dialog box, set the Output Size Width = 500, Height =
200:
Close
the Render dialog box.
Right-click on the camera viewport label and choose Configure.
In the Configuration dialog box, click the Safe Frames tab.
On the left side, uncheck all the boxes except Live Area. Then click
OK.
Right-click
on the camera viewport label and choose Show Safe Frame:
The
safe frame appears in the camera viewport.
Pan the viewport so that the leading edge of the floor touches the
bottom of the safe frame:

 Zoom
out of the Front viewport.
Zoom
out of the Front viewport.
Open the Lights sub-panel and choose Target Direct.
In the Front viewport, drag a Target Direct light toward the scene
objects:
In
the Modify panel, turn on Cast Shadows.
In the the Directional Parameters rollout, increase the Hotspot
so that the cone of illumination encompasses the entire scene.
Create
a second Target Direct light that points up at the scene from below
and set the Multiplier of the light to .5:
 Click Quick Render
to test the lighting:
Click Quick Render
to test the lighting:
Choose
Rendering > Environment.
In the Environment dialog box, click the Ambient Color swatch.
In the Color Selector, choose a middle gray and click Close.
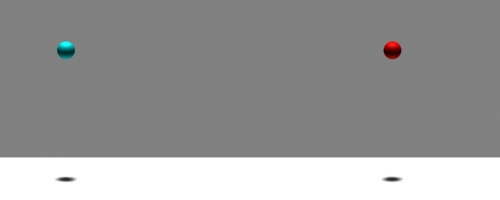
In the same way. set the Background Color to a middle gray.
The final color should look close to this:
Click Quick Render
to test the lighting again:
 Open
the Render dialog box.
Open
the Render dialog box.
Click
the Files button.
Name the file Ballbounce and choose the AVI file type:
In
the Video Compression dialog box, choose Microsoft Video 1.
Set the Compression Quality to 85:
Click
OK and Close.
Save
your scene file as Ballbounce.max.
When you are ready to render the animation, choose Quick Render.
The
two balls bounce in time with each other, no matter how far the
Launch Ball travels across the floor.
After
the animation finishes rendering, choose File > View File and
select Ballbounce.avi.
Watch
your animation play!